How to Upload Files to Google Drive from an Ubuntu Server using the gdrive command-line tool
This guide will walk you through the process of using the gdrive command-line tool to transfer files, such as build artifacts or backups, directly from your Ubuntu server to your Google Drive. This is particularly useful for automating transfers or making server files easily accessible.


On this page
Prerequisites#
- An Ubuntu server with SSH access.
- A Google account.
- The wget and tar utilities installed on your server (usually available by default on Ubuntu).
- A local machine with a web browser and SSH client.
Step 1: Install gdrive on Your Ubuntu Server#
gdrive is a single binary that you can download and make executable.
1. Determine your server's architecture:
- Open a terminal on your server and run:
dpkg --print-architecturedpkg --print-architecture
Most commonly, the output will be amd64.
2. Find the latest gdrive release download link:
Go to the gdrive GitHub releases page in your local machine's web browser:
https://github.com/glotlabs/gdrive/releases
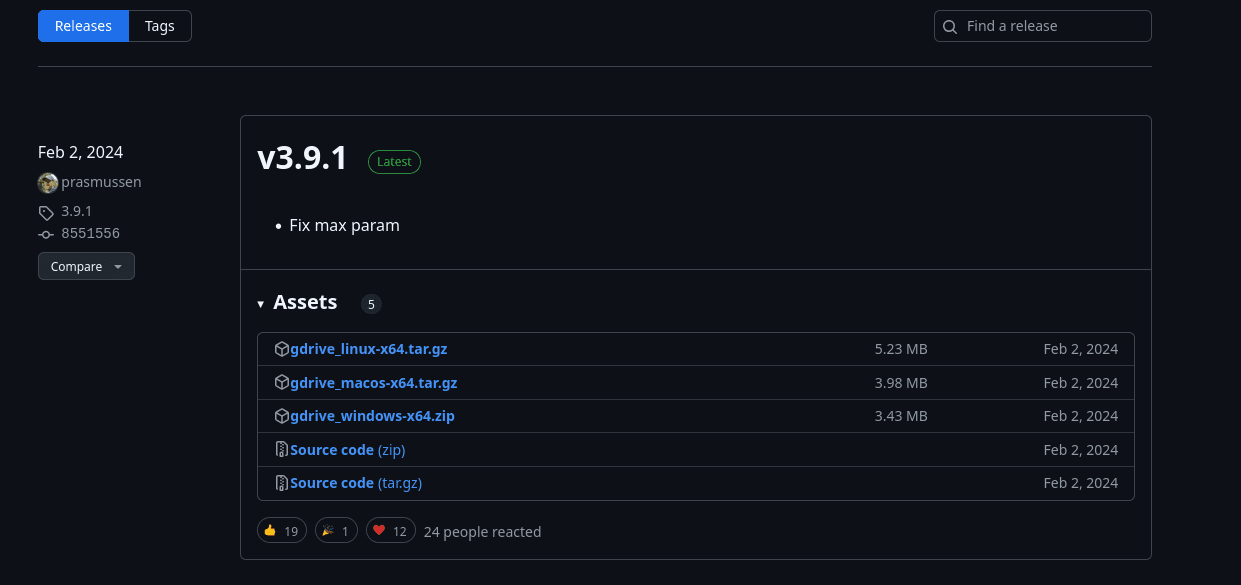
Locate the latest release. Under the "Assets" section for that release, find the file corresponding to your server's architecture (e.g., gdrive_linux-x64.tar.gz for amd64). Right-click on the download link for this file and select "Copy Link Address".
3. Download the gdrive binary to your server:
In your server's terminal, use wget followed by the copied download link:
wget <paste_the_copied_url_here>
For example, if the link for v3.9.1 is used:
wget https://github.com/glotlabs/gdrive/releases/download/v3.9.1/gdrive_linux-x64.tar.gz
4. Extract the downloaded archive:
tar -xzf gdrive_linux-x64.tar.gz
This will extract the gdrive executable file.
5. Make the binary executable:
chmod +x gdrive
6. Move the binary to your PATH (Optional but Recommended):
To be able to run gdrive from any directory, move the executable to a directory included in your system's PATH, like /usr/local/bin/:
sudo mv gdrive /usr/local/bin/
Step 2: Create Google API Credentials#
To allow gdrive to access your Google Drive, you need to create OAuth 2.0 credentials through the Google Cloud Console.
1. Go to the Google Cloud Console:
Open a web browser on your local machine and go to:
https://console.cloud.google.com/
Log in with the Google account whose Drive you want to access.
2. Create a New Project (if needed):
Click on the project dropdown in the upper left corner, then click "New Project". Give it a name (e.g., "Drive-Access-Tool") and click "Create". Select the newly created project.
3. Enable the Google Drive API:
Click the navigation menu (three horizontal lines), go to "APIs & Services" > "Library". Search for "Google Drive API" and enable it.
4. Configure the OAuth Consent Screen:
In the "APIs & Services" menu, go to "OAuth consent screen".
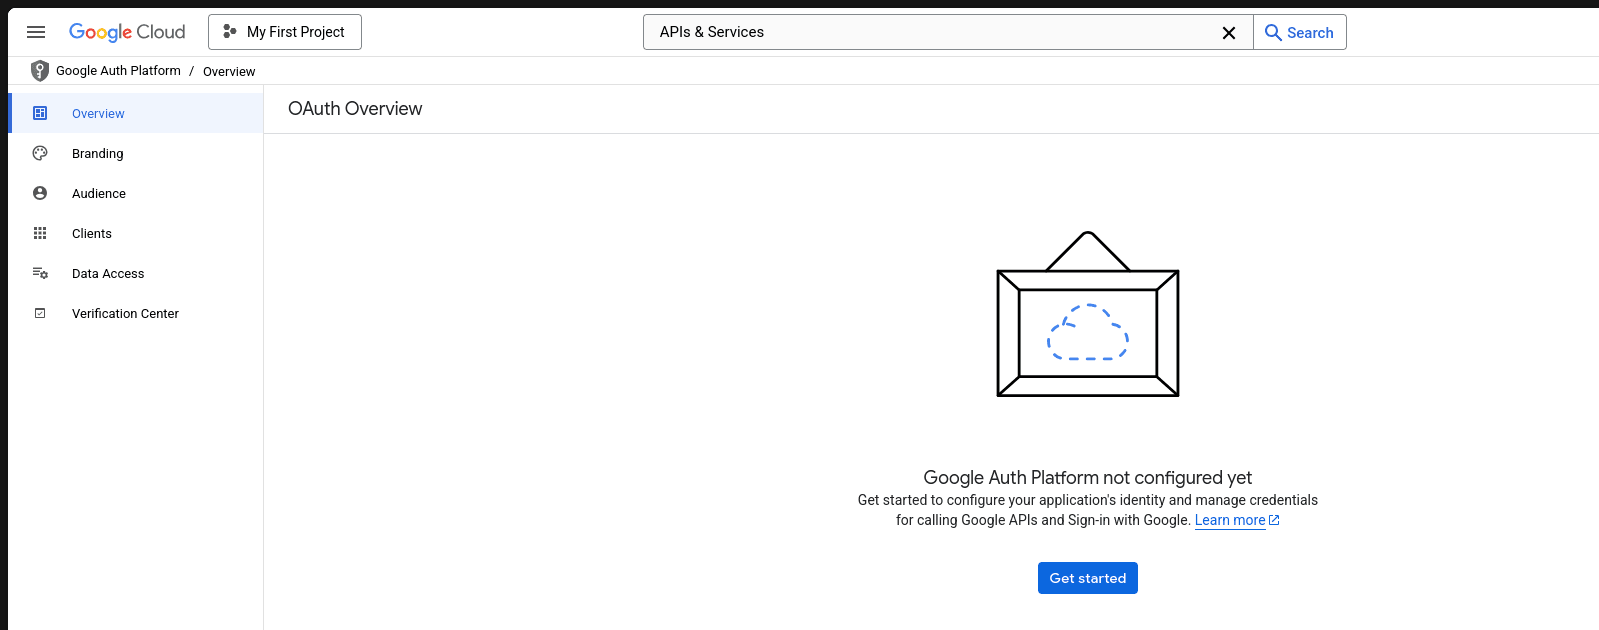
Choose "External" for the User Type and click "Create".
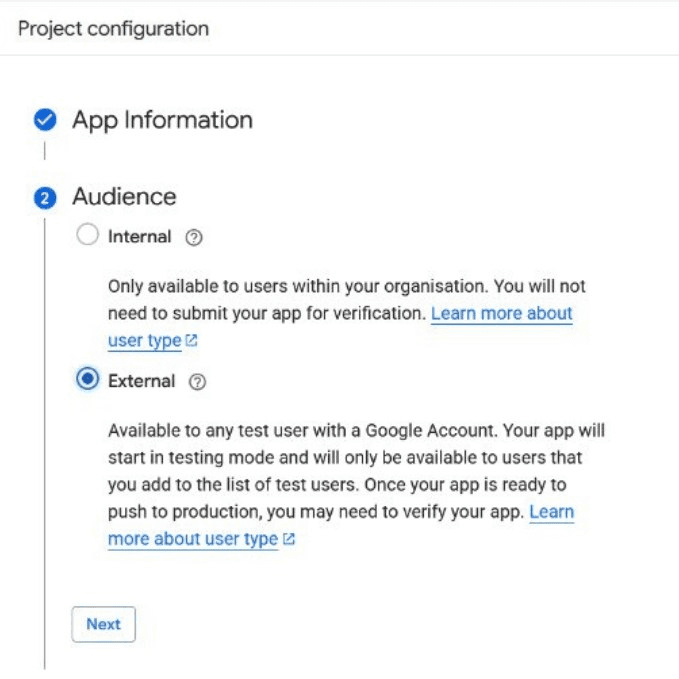
Fill in the required app information (App name, User support email, Developer contact information).
In the "Test users" section, click "+ Add users" and add the email address of the Google account you are using. This is crucial to avoid the "Access blocked" error while the app is in "Testing" mode.
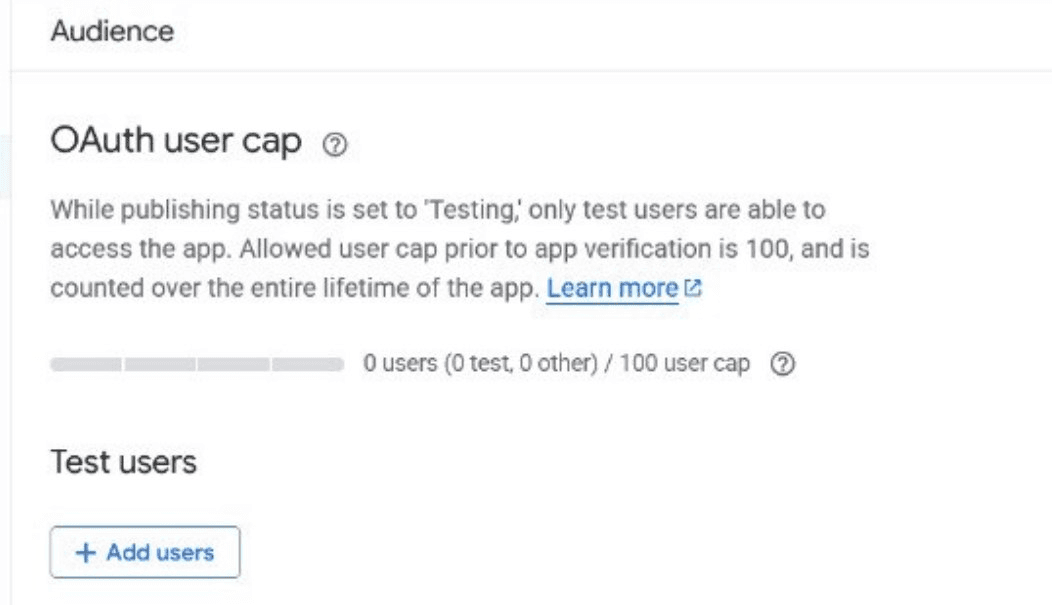
Save your changes. You do not need to publish the app to "In production" for personal use with test users.
5. Create OAuth 2.0 Client Credentials:
In the "APIs & Services" menu, go to "Credentials".
Click "Create Credentials" and select "OAuth client ID".
For "Application type", select "Desktop app".
Give it a name (e.g., "my-gdrive-cli") and click "Create".
Copy Your Client ID and Client Secret:
A window will pop up displaying your Client ID and Client Secret. Keep this window open or copy these values to a secure temporary location, as you will need them in the next step.
Step 3: Authenticate gdrive on Your Server#
This step links the gdrive binary on your server to your Google Drive account using the credentials you just created. Since your server likely doesn't have a graphical web browser, you'll use an SSH tunnel to complete the authentication flow from your local machine.
1. Start the gdrive account add process on the server:
In your server's terminal, run:
gdrive account add
The command will prompt you for the Client ID and Client Secret.
2. Enter Your Client ID and Client Secret:
Paste the Client ID you copied from the Google Cloud Console and press Enter.
Paste the Client Secret you copied and press Enter.
3. Copy the Authorization URL:
gdrive will then display an authorization URL. Copy this entire URL from the server terminal.
4. Set up an SSH tunnel on your local machine:
Open a new terminal window on your local machine and run the following command. This forwards a local port (8085) on your machine to the server's internal IP (127.0.0.1) on port 8085, where gdrive's temporary web server is running for authentication.
ssh -L 8085:127.0.0.1:8085 user@your_server_ip -N
- Replace user with your username for SSH access on your Ubuntu server.
- Replace your_server_ip with the public IP address or hostname of your Ubuntu server.
- The -N flag prevents the SSH command from executing a remote command.
Keep this SSH tunnel terminal window open and connected while you complete the authentication.
5. Open the Authorization URL in your local browser:
Paste the authorization URL you copied in step 3 into the address bar of your web browser on your local machine. Because of the SSH tunnel, your browser will connect to the gdrive process on your server.
6. Complete the Google Authentication in the browser:
Log in to your Google account (the one you added as a test user). Review the permissions gdrive is requesting and click "Allow".
7. Copy the Verification Code:
After successfully authorizing, you will be presented with a verification code in your browser. Copy this code.
8. Paste the Verification Code into the server terminal:
Go back to your original server terminal where gdrive account add is waiting. Paste the verification code you just copied from the browser and press Enter.
gdrive should now show a success message indicating that the account has been added and you are logged in. You can now close the local terminal window running the SSH tunnel (by pressing Ctrl+C)
Step 4: Upload Your File to Google Drive#
Now that gdrive is authenticated, you can upload your files from the server to Google Drive. You can create folders beforehand to organize your uploads.
1. Create destination folders in your Google Drive (Optional but Recommended):
You can create folders directly using gdrive. You'll need the Folder ID of the parent folder if you're creating nested folders or uploading to a specific location other than the root.
- Create a folder in the root of your Drive:
gdrive files mkdir my-builds
The output will provide the Folder ID of the new folder. Note it down.
- Create a subfolder inside another folder using the parent folder's ID:
gdrive files mkdir --parent <parent_folder_id> my-specific-build
Replace <parent_folder_id> with the actual ID of the parent folder. The output will provide the Folder ID of the new subfolder.
2. Upload your file:
Use the gdrive files upload command with the path to the file on your server and the --parent option if uploading to a specific folder.
gdrive files upload --parent <destination_folder_id> /path/to/your/local/file.zip
Replace <destination_folder_id> with the Folder ID of the folder where you want to upload the file. Replace /path/to/your/local/file.zip with the actual path to your file on the server.
If you want to upload to the root of your Drive, simply omit the --parent option:
gdrive files upload /path/to/your/local/file.zip
To upload an entire directory recursively, use the --recursive option:
gdrive files upload --recursive --parent <destination_folder_id> /path/to/your/local/directory
gdrive will display the upload progress in your terminal.
Automation#
You can integrate the gdrive files upload command into your server-side scripts (like build scripts or cron jobs) to automate the process of uploading files after they are generated.
By following these steps, you can effectively use the gdrive command-line tool to upload files from any Ubuntu server to your Google Drive.
Conclusion#
You've now successfully learned how to leverage the `gdrive` command-line tool to effortlessly push files from your Ubuntu server to your Google Drive. This method offers a robust and scriptable way to manage your remote server's files, whether for backups, build artifact storage, or simply transferring data. By following the steps outlined in this guide – from installation and authentication to uploading files and directories – you can integrate Google Drive into your server workflow.
Remember to keep your `gdrive` credentials secure and explore the various options the `gdrive` tool offers for more advanced file management tasks.
Feel free to automate the upload process by incorporating the `gdrive` commands into your shell scripts or cron jobs, making your server maintenance and data management even more efficient.
If you encounter any issues or have further questions, feel free to ask in the comment section below!